![]()
![]()
![]()
![]()
![]()
![]()
Ron Stultz
![]()
How to - "Replace Dryer Drum Belt GE DSXH47EGOWW"
Summary: Easy enough do-it-yourself if you have the tools and are handy.
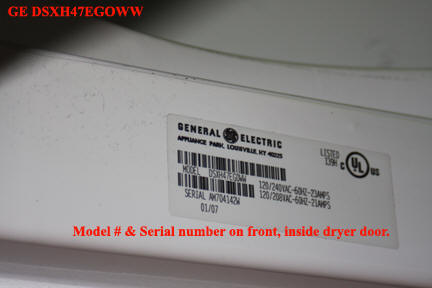
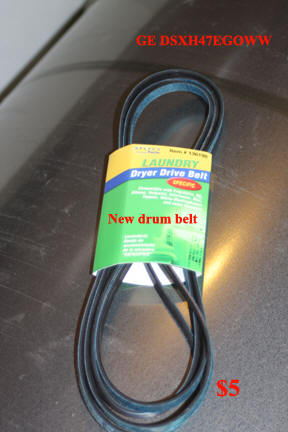
Dryer drum belt on my daughter's General Electric (GE) electric dryer model DSXH47EGOWW broke and needed to be replaced.
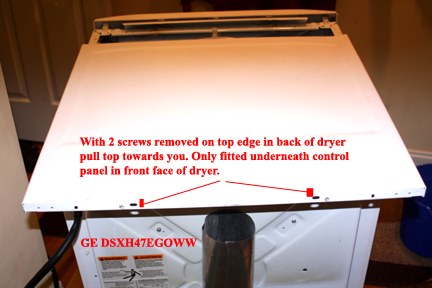
1. Carefully unplugged dryer from dryer outlet and rotated dryer around to the back. Removed 2 screws from the top edge and pulled the top of dryer towards me and removed.
.jpg)

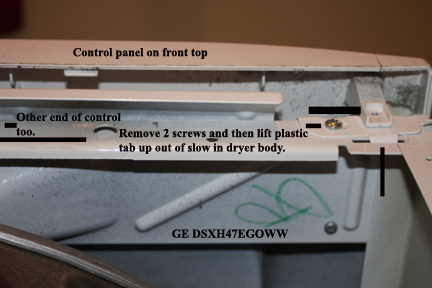
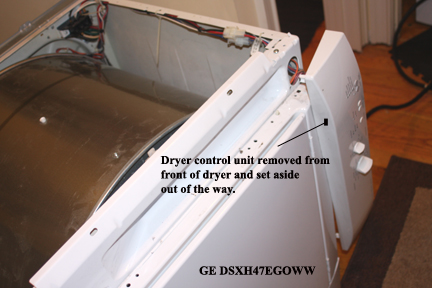
2. Went to front of dryer and removed 4 screws, as seen from top looking downward, holding plastic control panel to front of dryer. Lifted control panel rear tabs up off front of dryer and slung to one side to get out of way.
.jpg)
3. To get new drum belt on the drum, needed to remove dryer front enough to get belt down and around drum. To loosen front, removed screw on each side, down inside front edge.
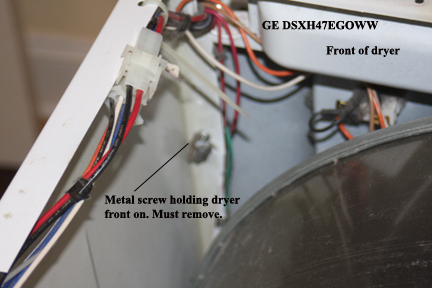
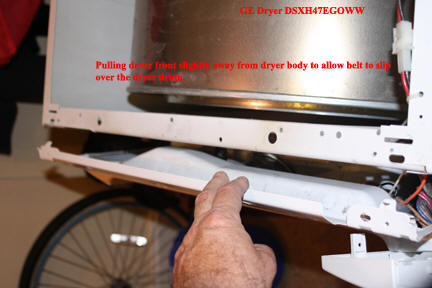
4. Once 2 screws removed holding top 1/2 of front to dryer sides, pulled front away from dryer body. Note that dryer front has a tab on each side that fits into a slot in dryer body. With dryer front pulled forward, took belt and moved it past felt gasket on dryer front and onto dryer drum.
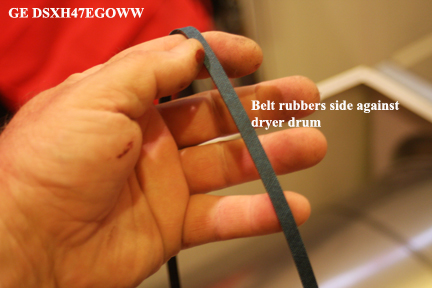
The dryer drum belt goes on the drum rubber down or against the drum. When you put belt on drum, make sure it is not twisted and slowly move it close to the rubber mark left by the old belt near the rear of the drum.
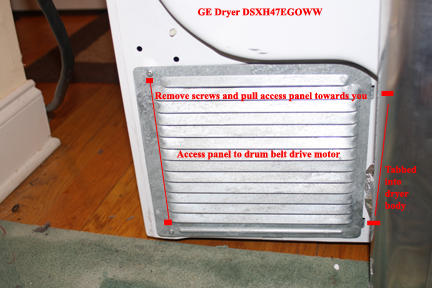
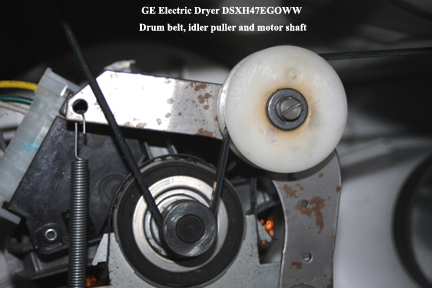
5. With dryer drum belt in place, went to the back of the dryer and removed the dryer motor access panel by removing the 2 screws on the left side of the panel and pulled the panel towards me and lifted access panel from tabs on right side.
.jpg)
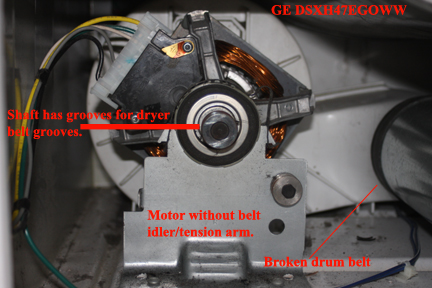
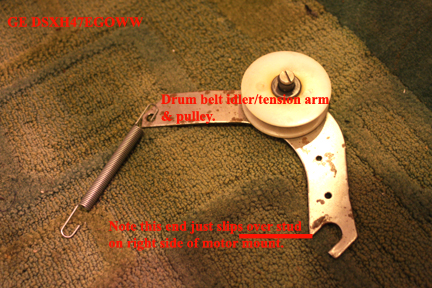
6. Moved dryer drum belt into position and threaded it around motor shaft and tensioner pulley and then pulled spring down and hooked into hole in motor mount.
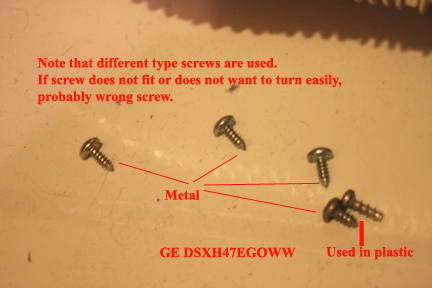
7. Reattached: dryer front to dryer body; control panel to dryer front; dryer top to dryer body. (Note that several different kinds, sizes of screws used in dryer and if a screw does not fit or turns hard after only a turn or 2, probably wrong screw for hole and try another screw.) Carefully plugged dryer into dryer outlet and started dryer. Looking in motor access hole, watched motor turn drum and let drum turn for several minutes.
8. When sure dryer belt correctly installed, reattached cover over motor access hole.
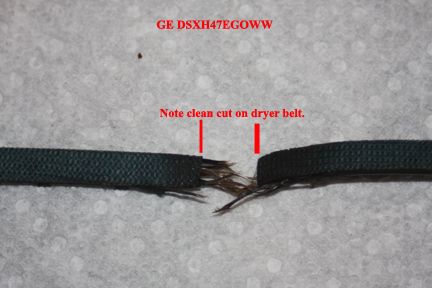
Broken dryer drum belt, but why?
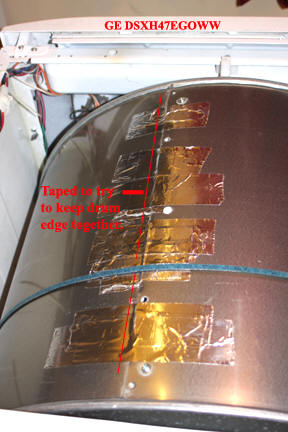
Dryer belts are up against a metal drum that gets hot and over time, the rubber simply gets dried out or old and begins to develop cracks until eventually the load of rotating the drum is too much and the belt snaps at some crack. Belt cracking due to heat however, takes years. If your dryer is 10 years or older then if the belt goes, that is pretty normal but in my situation, the dryer is only 2 years old and already is on its 3rd belt, counting the factory installed. ?? An examination of the idler/tension arm and pulley with a new belt installed and the drum turning, revealed no visual problem. The belt was not skewed in any way and although the drum is not perfectly round and the spring on the tension arm did flex per revolution of the drum, that more likely to kill the spring than the drum belt. Then I placed my hand on the drum as it rotated to see if I could put enough load on the belt to force it to break and almost immediately I felt a sharp edge as the drum rotated. So I stopped the dryer and hand rotated the drum around until I found where the sheet metal of the drum had been pieced together and sure enough, there was a sharp edge sticking up when I think there should not have been.
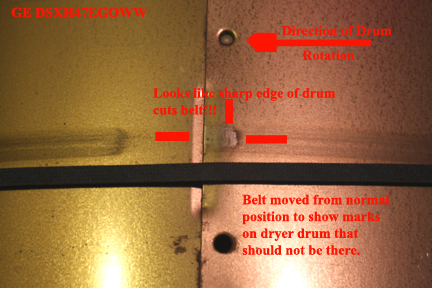
It is my current theory, only to be proved if dryer does not kill another belt in next year or so, that sharp edge on drum was slowly but surely cutting the thickness of the belt on each revolution of the drum. But what action to take to correct? Had some metal duct tape and began apply along edge building up so that there was no edge belt would hit. Then for some structure strength, ran metal tape along entire length of seem.
Update: 16 November 2010: Belt installed in April 2009 has not had to be replaced. Feel comfortable now in saying sharp edge on drum was causing belt to break. Of course contacted GE about this but they know nothing as was expected.