"JBL L7 - Inside"
By Ron Stultz
30 January 2015

Summary: All drivers, crossovers, are held in place with Phillips head screws. High range crossover board is located on inside back just above speaker connection panel and is gotten to by removing side mounted woofer.
Background:
2 JBL L7's bought new.
Right L7 dead.
Took apart to test crossovers and speakers.

Front speakers (drivers) removal:
Remove front speaker cover.
All speakers are held in place by Phillips screws.
The tweeter and mid-frequency speakers are not overly heavy but be careful removing.
The largest front speaker is heavy so remove bottom screws first and then top.
Speaker wires to each speaker is configured with one large connector and one smaller connection so you do not have to worry about marking polarity of wires UNLESS wires have been replaced or modified.
Speaker wires are held in place in the low and middle frequency speakers by hot glue where the wires enter the enclosed speaker space.
The tweeter speaker wires comes directly from the crossover, so be careful these wires do not slip back and down into the cabinet.
Side woofer speaker removal:
Using a small flat blade screw driver or knife edge, pry up the plastic and cloth speaker cover over the side woofer speaker.
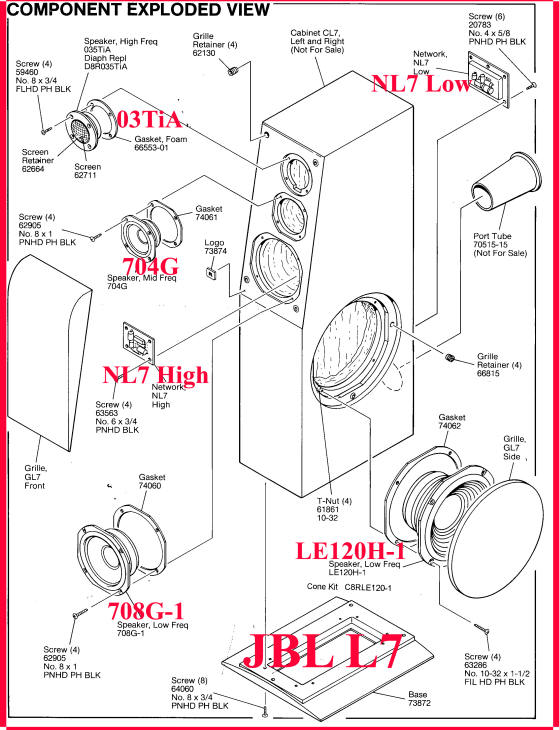
You can see from exploded diagram above, woofer cover is held in place by 4 plastic tabs that insert into rubber grommets in wood of cabinet.
Be careful removing as you do not want to break plastic ring.
Woofer is quite heavy, so remove bottom Phillips screws and then one of the top and finally the other top. Warning that this speaker is heavy and once screws are removed might want to slide down and out of cabinet.
Unhook speaker wires. As with other speakers, the speaker connectors are different sizes so you do not have to worry about marking wires for polarity Unless wiring has been modified or replaced. Speaker wires go directly to NL7 low crossover.
Speaker testing:

Using an ohm meter, you can test all speakers. No ohm reading at all indicates an open cone coil and speaker must be replaced or re-coned. And yes, there are speaker re-cone services available on the Internet.
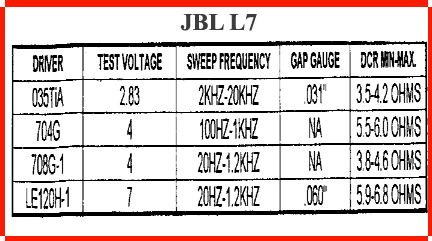
If all speakers ohm ok (see above chart), you still need to test that cone coil has not been jammed against surrounding magnet and not moving like it should. This testing applies to all speakers except the tweeter. Using a 1.5volt battery quickly connect the battery across speaker terminals and you should hear a "burp". If no "burp" coil is stuck and speaker replaced or re-coned.
Crossovers:

There are 2 crossover "boards".
The NL7 Low is part of the speaker connection panel and easily removed using a small Phillips screw driver. From the connector panel, there is a set of wires that go the NL7 high crossover board mounted directly above the speaker terminal panel. Also, wires for the LE120H-1 woofer come directly off the NL7 Low crossover.
The remove the NL7 High crossover, you have to removed 4 Phillips screws holding the board to the back wall of the cabinet and then remove hot glue used to hold the low and middle frequency front speakers. This hot glue can be removed with a knife, carefully.
Once all speaker wires are loose, poke wires through holes in speaker enclosures and then slowly remove NL7 High crossover from cabinet.
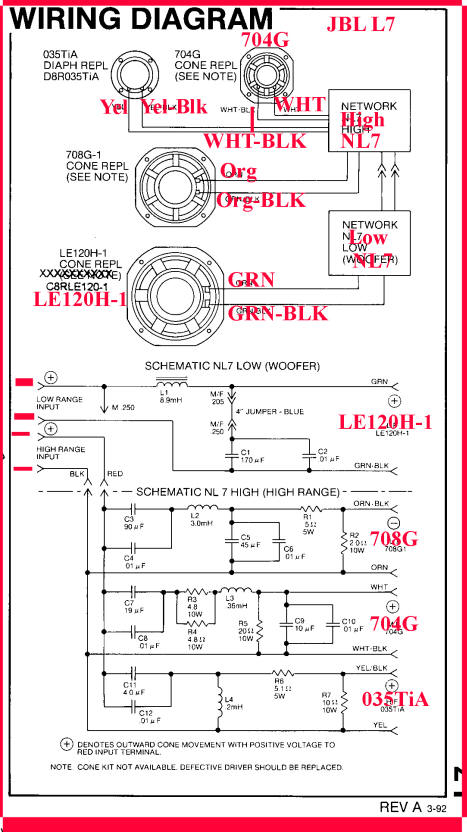
In looking at diagram above, it would be odd for a complete failure of the NL7 High crossover as there are 3 different circuit paths. One path might fail perhaps, but not all 3.
Crossover repairs or replacement:
If you have checked speaker wires from you receiver or amplifier to JBL L7 and also tested each speaker and you still do not have sound, time to have crossover looked at by a professional.
Yes, there are crossover repair companies available on the Internet.
In my case, I did contact JBL for a replacement NL7 High but they told me not available and eBay yielded nothing.
Finally, after taking JBL L7 apart and having crossover sent out for testing and repair, found that speaker wire from my amplifier to dead JBL L7 have been chewed through by a mouse or pet dog. SO always check speaker wire connections first.