"Samsung NP-N145+ Will Not Turn On"
By Ron Stultz


Summary: most likely that plastic on/off switch cover is broken and is not moving the slide switch that is mounted on the motherboard. Easy enough do-it-yourself (DIY) repair.
Background:
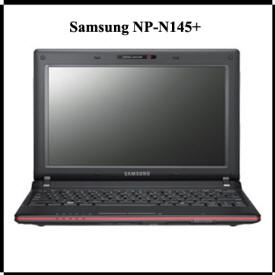
Samsung NP-N145+.
3 years old.
Became erratic as to if it would turn on or not.
Eventually got to the point it would not turn on at all.
Power adapter checked and supplying correct 19 volts direct current (VDC).
DIY fix described below probably applicable to many other Samsung netbook models.
Problem:
On/off of the Samsung is controlled by a small slide switch mounted on the motherboard on the front right corner.
To slide this switch to the right such that the small slide switch triggers an "on" signal, Samsung uses a small plastic slide switch cover.
This slide switch cover sits over the edge of the motherboard.
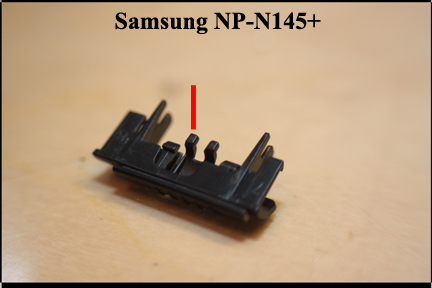
Unfortunately, the design of the slide switch cover is such that the one plastic prong that actually pushes the electrical slide switch on the motherboard is so small that it eventually breaks and does not push the motherboard switch far enough to turn on the system.
In the image below, you can see the white motherboard mounted slide switch and also the black plastic slide switch cover.
Although you can not see the slide switch cover prong that is probably broken, you can see the prong sticking out on the right side of the electrical slide switch.
Also note how the slide switch cover simply sits on the edge of the motherboard.
Also note that the image below shows the motherboard out of the plastic shell of the NP-N145+ but it is not necessary to remove the motherboard to do a switch cover replacement or repair.
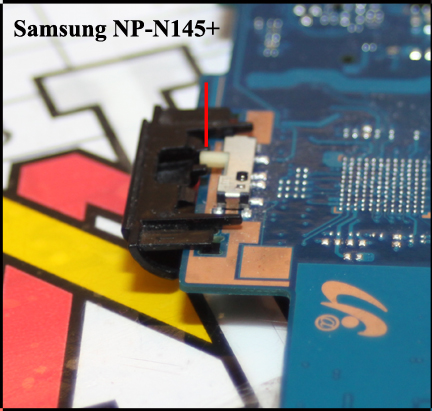
Image below should new slide switch cover but high lights in red the plastic prong that breaks on the slide switch cover.

Replace or repair:
The easiest repair for most is to buy a replacement slide switch cover off the Internet. There are several listings on eBay as of this date.
However, because the slide switch cover is not designed correctly with enough strength on the prong that actually pushes the electrical slide switch to the right, you might have to replace the switch cover again in the future if you use the Samsung a lot.
A repair of your current switch involves beefing up the prong on the slide switch that pushes the electrical slide switch and this can be done by gluing something across the 2 prongs if the left prongs has not completely broken off.
In my case, I did a variation where I glued a strong piece of wire to the left or pushing prong.
In either case, repair your old one or replace with a new one, you have to do the following:
- Remove the back cover from the NP-N145+
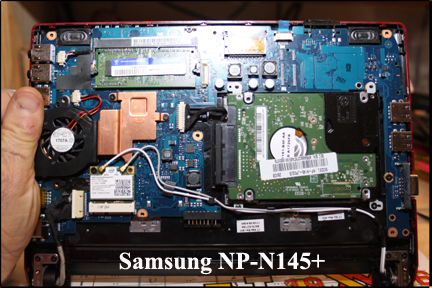
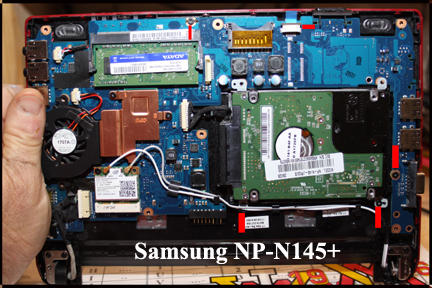
- With back cover removed, now remove the remaining Phillips screws. There are 2 holding the motherboard in place and 2 holding the hard drive in place. The image below the location of the screws.
- Now you must unhook the small blue ribbon cable that goes to the light emitting diodes (LED's) on the front case. You do this by using a finger nail to push upward on the small black/gray band you see and once it is up, use plastic tab on ribbon cable to pull it straight out of the connector. You must release this cable to get enough room to remove and install new slide switch cover.
- Now on the edge with the slide switch cover, tip the motherboard up and outward enough to slowly work the slide switch cover off the motherboard mounted slide switch. The cover just sits on the edge of the motherboard. Go slow until you see how it releases.
- If you replacing, place new switch cover in place making sure the left prong is on the left side of the white slide switch.
- With the new slide switch cover in place, test by sliding the switch to the right.
- The slide switch cover must slide the white electrical switch all the way to the right for the electrical switch to trigger a start.
- If you repairing your old switch, just be careful using superglue or similar. I found that superglue wants to melt the plastic used in the Samsung slide switch cover.
- Now reinstall the small ribbon cable from the LED lights. You do this by holding up the black/gray band while inserting the ribbon cable as far into the connector as possible and then pushing the black/gray down tight against the white portion of the connector. A gentle tug on the ribbon tab should not dislodge the ribbon cable from the connector. If the ribbon cable comes out, then you need to repeat process and get cable as far into connector as possible before pushing band down to latch cable in place.
- Now reinstall screws that hold motherboard and hard drive.
- Now take a look at all connectors on motherboard and make sure none are dislodged
With new switch or repaired old switch cover in place, reinstall the back cover.
Turn netbook over and check that keyboard is still in correct position with the end towards the edge of the netbook with the LED lights tabbed into the top cover and the other edge of the keyboard aligned correctly with the other edge of the top cover.
Once all back together, reinstall battery and power adapter and test.
You probably got it BUT if not, do above over again with special attention to how prong of switch cover must sit to the left of the electrical, motherboard mounted, slide switch.
Wishes Samsung had do a simple push button on/off switch instead of their slide arrangement or at least made a slide switch cover strong enough to endure 1000's if not millions of activations.